Thursday, 17 May 2012

Setting up proxy for apps in android emulator


Proxy for Android apps not working even after u tried all proxy settings in emulator? Is your android proxy setting only working for browser not for apps in emulator?
In some of the previous posts(http://hakers.info/site/2011/08/setting-up-proxy-for-android-emulator/) we saw how to setup a proxy for android emulator using settings available in emulator itself. The problem with that approach is that it works only for the browser, it does not work with the apps installed inside the emulator. As I couldn’t find any solution for this problem in android emulator I thought of finding a work around to perform this task. One workaround I found is that we should use the base machine itself to capture the packets which emulator (the apps in emulator) is sending.
We can use many network analyzer tools like wireshark etc to capture and analyze the packets but using these tools you can only capture the packets, there is no option to tamper the packets at runtime. If there is a requirement in which you just have to capture the packets and analyze them wireshark will suffice the needs. But if you want to tamper the request and response(which we normally do using Paros/fiddler in web applications) you need to have a tool which can capture network packets and has a capability to intercept and tamper them.

One of these tools I can suggest is Echo Mirage by BindShell which has nearly all of the features we need. It uses DLL injection and function hooking techniques to redirect network related function calls so that data transmitted and received by local applications can be observed and modified. Using these techniques this tools gives you an advantage that it will attach itself to a particular ‘exe’, due to this packets of only a particular exe are captured(in case of wireshark we have to use filter as it captures each and every packet with goes out of the machine).
To setup a proxy using Echo Mirage use the steps given below:
1.)Download latest version of Echo Mirage.
Latest version of Echo Mirage can be downloaded from:
http://www.bindshell.net/tools/Echo Mirage.html
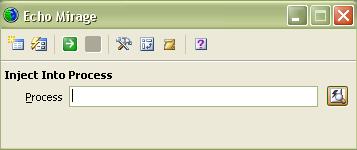
2.)Open Echo Mirage and emulator.
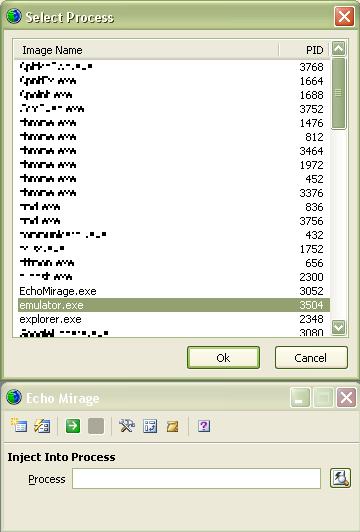
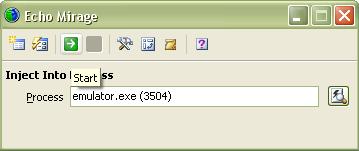
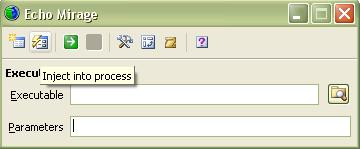
3.)  After both the applications are running, using Echo Mirage we need to inject into emulator.exe. To do so click on second tab on Echo Mirage (inject into process). Enter the process name emulator.exe or click on select process to select emulator.exe and click on start.


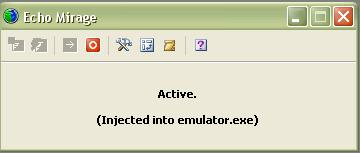
4.) If everything works fine you will get a window like this.


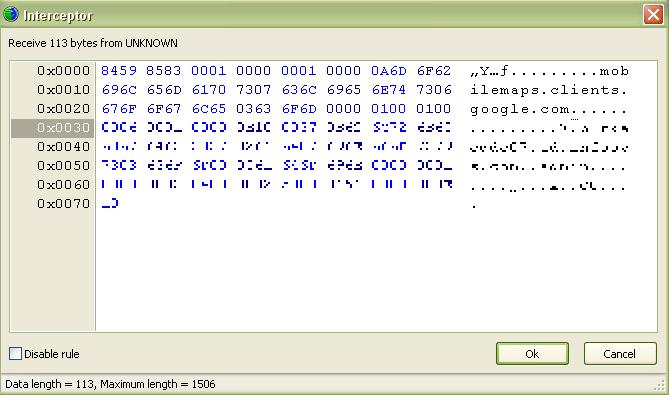
5.) Echo Mirage is now ready to trap and intercept all your requests which are sent through emulator.exe.  The screenshot of interceptor below was taken when I tried to open maps application in emulator after setting up Echo Mirage.


You can watch this video to see how to use paros and echomirage to setup the proxy for android emulator or devices.


Hope this article was helpful to you and will further help you in penetration testing of android apps.

Wednesday, 16 May 2012


A Guide To Installing APK Apps On Your Google Android Phone

Because the Android operating system is a relative newcomer to the mobile phone market, a strong and cohesive Android Internet support community appears to be lacking. Without an adequate Android support system in place, many Android users are left in the dark when it comes to many tricky tasks, like installing third party applications to their Android mobile phones. In order to install third party applications to your Android phone, you need to install APK, or Android Package, files. In this article, we will cover the two ways you can install APK files to your Android phone and show you how to take advantage of the wide variety of third party Android applications currently available.

Installing Applications Through the Android Market

The Android Market is essentially Android’s answer to Apple’s iPhone App Store. As of September 2009, the Android Market already offered well over 10,000 applications, and this number has only continued to grow. In addition to the applications the Android Market offers, you can also use it to install other downloaded third party applications.
1.    Copy the APK file to your Android’s memory card and insert the card into your phone.
2.    Download and install the Apps Installer application from the Android Market
3.    Once installed, the Apps Installer will display the APK files on the memory card.
4.    Click and install your APK files.

Installing Applications With Android SDK

It is possible to install APK files without utilizing the Android Market, although the process is more difficult and complex. To avoid the Android Market, you need to use Android SDK.
1.    Download and install the Google Android SDK program and the Android USB drivers. The download links are as follows: http://code.google.com/android/intro/installing.html
3.    You need to modify your Android’s settings to allow the installation of applications from other sources. Under “Settings,” select “Application Settings” and then enable “Unknown Sources.” Also under “Settings,” select “SD Card” and “Phone Storage,” and finally enable “Disable Use for USB Storage”
4.    This last step is easy. Open Command Prompt and type the following: adb install <1>/<2>.apk
5.    However, when you type the command, replace <1> with the path to your APK file and replace <2> with the name of the APK file.
6.    You’re done! Your application is now ready for your use and enjoyment.

 Test case authoring guidelines - Mobile Applications


This describes basic rules that a tester has to follow while authoring test cases for Mobile Applications
 In general people use Mobile Applications when they are mobile and want to do important tasks. Keeping this in mind mobile applications are designed with ease of use, to achieve this through testing of applications plays significant role.


Following high-level guidelines help testers to write effective test cases for Mobile Applications

          Understand functionality thoroughly
          Get thorough business knowledge from Business Analyst
          Think of how end user uses the applications
          Be acquainted with device specific controls (In mobile device we use limited control across the application so be aware of how controls work)
          Give an emphasis on UI (alignment and look and feel of different controls and content)
          Check for security loopholes wherever possible by verifying all the application related logs
          Verify responsiveness of application when server is loaded with peak loads
          Think of interrupt services (that may have priority than your application), especially in-built functionality like in-coming call, message services, low battery, week/no network, connecting/disconnecting charger during usage of application
          Check for different error messages
          Don't be think of too many negative scenarios, because mobile users want to complete the tasks with less input and quickly
          For thin client (Web) applications, need to verify in different browsers based on end user usage


How to Setup Android Application Development on Eclipse


Android SDK provides the tools and APIs necessary to begin developing applications on the Android platform using the Java programming language. Android offers a custom plugin for the Eclipse IDE, called Android Development Tools (ADT), that is designed to give you a powerful, integrated environment in which to build Android applications.


Android 2.1 on Emulator
This tutorial is intended for new developers that want to start developing Android applications using

Eclipse IDE . To start develop, you have to install Java platform (JDK)  first and then  install the Eclipse,  


Android SDK and the  Android Development Tool (ADT) plugin for Eclipse.
Download and Install JDK
Download and install the latest JDK (JDK 1.6 Update 18) from JDK download page
Download and Install Eclipse IDE
Download and install Eclipse Classic 3.5 (Galileo) from Eclipse download page. You can also use the  Java or RCP version of Eclipse.
Download and Install Android SDK Starter Package
The Android SDK starter package includes only a single component, the latest version of the SDK Tools. Included in that component is a tool called Android SDK and AVD Manager that you can use to download other components from the SDK repository site.
       Download the latest Android SDK  starter package  from the SDK download page.
       Unpack the archive to a suitable location on your machine. By default, the SDK files are unpacked into a directory named  android-sdk-<machine-platform> . For example, on Windows platform the directory will be android-sdk-windows.


Android SDK
Add Android Platforms to Your SDK
To add one or more Android platforms (for example, Android 1.6 or Android 2.1) to your SDK, use the Android SDK and AVD Manager, included in the SDK starter package. It is recommended  to download multiple platforms, so that you can build your application on the lowest version you want to support, but test against higher versions that you intend the application to run on.
                     Launch the Android SDK and AVD Manager on Windows by executing SDK Setup.exe at the root of the SDK directory. On


Mac OS X or Linux, execute the android tool in the /tools/ folder.
       On Available Packages menu, select the platforms to download (1.1 to 2.1).


       If you find error on HTTP SSL while fetching the repository url , try to use http instead of https by checking the Force https://… sources to be fetched using http://… option on Settings menu.


       Click Install Selected and then select Accept All to accept selected packages.
       Click Install Accepted button to start download and install the selected packages.


Download and Install ADT Plugin
To install  the ADT Plugin, you can take advantage of the Eclipse remote update feature. By setting up a remote update site, you can easily download, install, and check for ADT updates. Alternatively, you can download the latest ADT to your development computer as a local site archive.
       Launch Eclipse, then select Help –> Install New Software.


       In Available Software dialog, click Add
       Enter a name for the remote site (ex: Android Plugin) in the Name field and in the Location field, enter this URL:
https://dl-ssl.google.com/android/eclipse/
and then click OK. If you have trouble acquiring the plugin, you can try using ‘http’  instead of  ’https’  in the URL.


       Select the checkbox next to Developer Tools, which will automatically select the nested tools Android DDMS and Android Development Tools and then click Next.


       On the next dialog, click Next to read and accept the license agreement and install any dependencies, then click Finish.
       Restart Eclipse
       To check whether the ADT has been installed correctly, try to create a new project by select File > New > Project., you shoud find Android Project listed on project wizard.


Mobile Emulators

What is an Emulator?
An emulator is a software program that aims to replicate the functions of a specific piece of hardware or software.
What are Mobile Emulators?
Getting any mobile application Tested on various devices when they are not available has always been a great problem for developers .Even after porting your application on various devices, it is very important to get it tested for overall success of that application.
But the real problem is how many devices you can buy since numbers of devices are too large. That’s why we use Emulators. Emulators can be used instead to allow you to simulate testing on the real device. The benefits of using Mobile Emulators are:
  • No data browsing charges are incurred, as all browsing is performed via your standard Web connection
  • Quicker access to devices – starting an emulator is faster than switching SIM cards and rebooting devices
  • Provides access to a potentially large number of devices/browsers – the number of devices you can use is only limited by hard disk space and the number of emulators you can find
  • Inexpensive – many emulators are available for free

Types of Mobile Emulator:

          Mobile emulators fall into three main categories:
  • Device emulators - These are generally provided by device manufacturers and simulate the actual device. Device emulators are excellent for testing your site or application on a particular device or set of devices.
  • Browser emulators - These simulate mobile browser environments. Useful for determining the functionality available in a particular mobile browser, they are useless for device-specific testing.
  • Operating System Emulators - Microsoft provides emulators for Windows Mobile, and Google provides an emulator for Android. These run within a simulated mobile device environment and provide access to applications running within the operating system, e.g. a Web browser.

Popular Emulators:

          The following companies offer emulators for some or all of their mobile devices:
  • Research in Motion (Blackberry)
  • Apple (iPhone)
  • Palm
Operating system emulators are available from:
  • Microsoft (Windows Mobile)
  • Google (Android)
  • Nokia (Series 40 and Series 60)
Some available browser emulators are:
  • Opera Mini
  • Open wave

Web-based Emulators

          Web-based emulators are easy and quick to access – no installation, just enter the correct URL and start testing.

Apple (iPhone) Emulators

          A full iPhone emulator is included as part of the iPhone SDK. To obtain this, register with Apple as a developer.
          Fortunately, there’s a FREE iPhone simulator available on the Web. It can be found at testiphone.com.
          This provides a nice, quick way of testing your Web sites on a simulated iPhone. Just type in the URL of the site you want to test and hit ENTER.


Palm Emulators

Introduction and Downloading

Palm is making a big splash in the mobile world with its upcoming Pre. A Palm Pre emulator can be downloaded from the Palm developer site as part of the Mojo SDK. You need to register to download the SDK, which is available for Windows, Linux, and Mac. It is reliant on Java 6 and Virtual Box (Sun’s virtual machine software) being installed, links to both of which are provided on the download page. Again, be aware of the download size – Virtual Box is over 60MB and the Mojo SDK is around 176MB.

Installing and Running

Once you’ve downloaded everything, and made sure Java and Virtual Box are installed, you can install the Mojo SDK. Doing this is a snap; just click Next a couple of times. After installation is complete, a Palm folder will appear in your Start Menu. Click on this, then on SDK. You’ll see a Palm Emulator menu item. Click on this and the emulator will load (it runs as a VirtualBox virtual machine – you may receive a firewall warning):

Palm Pre emulator
This emulator emulates a Palm Pre running the Palm WebOS. Click on the black arrow icon and the menu will appear. Click on Web to launch the Web browser. Type in the URL of the Web site you want to test and it will load up in the WebOS browser:

Palm Pre emulator displaying web page
This is a really powerful emulator and is well worth downloading. The Mojo API also contains lots of interesting sample projects, so download it and have a play.


Android App Submission Process


Create an Android Publish account:

To publish app we need to sign the app and need an android developer account.
            Use below link to register as an Android Market Developer. The developer name as it has to appear in the market can be changed at any time once the account has been created.

Signing for Public Release

When your application is ready for release to other users, you must:
2.    Get Google Maps keys for the private key and integrate the same with application.

1. Obtain a suitable private key


For signing certificate we need the below information from client
Name of publisher:
Organizational Unit:
Organization:
Location of Organization:
State:
City:

In preparation for signing your application, you must first ensure that you have a suitable private key with which to sign. A suitable private key is one that:
ñ Is in your possession
ñ Represents the personal, corporate, or organizational entity to be identified with the application
ñ Has a validity period that exceeds the expected lifespan of the application or application suite. A validity period of more than 25 years is recommended.
If you plan to publish your application(s) on Android Market, note that a validity period ending after 22 October 2033 is a requirement. You can not upload an application if it is signed with a key whose validity expires before that date.
ñ Is not the debug key generated by the Android SDK tools.
The key may be self-signed. If you do not have a suitable key, you must generate one using Keytool. Make sure that you have Keytool available, as described in Basic Setup.
To generate a self-signed key with Keytool, use the keytool command and pass any of the options listed below (and any others, as needed).
Warning: Keep your private key secure. Before you run Keytool, make sure to read Securing Your Private Key for a discussion of how to keep your key secure and why doing so is critically important to you and to users. In particular, when you are generating your key, you should select strong passwords for both the keystore and key.
Keytool Option
Description
-genkey
Generate a key pair (public and private keys)
-v
Enable verbose output.
-alias <alias_name>
An alias for the key. Only the first 8 characters of the alias are used.
-keyalg <alg>
The encryption algorithm to use when generating the key. Both DSA and RSA are supported.
-keysize <size>
The size of each generated key (bits). If not supplied, Keytool uses a default key size of 1024 bits. In general, we recommend using a key size of 2048 bits or higher.
-dname <name>
A Distinguished Name that describes who created the key. The value is used as the issuer and subject fields in the self-signed certificate.
Note that you do not need to specify this option in the command line. If not supplied, Jarsigner prompts you to enter each of the Distinguished Name fields (CN, OU, and so on).
-keypass <password>
The password for the key.
As a security precaution, do not include this option in your command line. If not supplied, Keytool prompts you to enter the password. In this way, your password is not stored in your shell history.
-validity <valdays>
The validity period for the key, in days.
Note: A value of 10000 or greater is recommended.
-keystore <keystore-name>.keystore
A name for the keystore containing the private key.
-storepass <password>
A password for the keystore.
As a security precaution, do not include this option in your command line. If not supplied, Keytool prompts you to enter the password. In this way, your password is not stored in your shell history.
Here's an example of a Keytool command that generates a private key:
$ keytool -genkey -v -keystore my-release-key.keystore
-alias alias_name -keyalg RSA -keysize 2048 -validity 10000
Running the example command above, Keytool prompts you to provide passwords for the keystore and key, and to provide the Distinguished Name fields for your key. It then generates the keystore as a file called my-release-key.keystore. The keystore and key are protected by the passwords you entered. The keystore contains a single key, valid for 10000 days. The alias is a name that you — will use later, to refer to this keystore when signing your application.
For more information about Keytool, see the documentation at http://java.sun.com/j2se/1.5.0/docs/tooldocs/#security

2.     Integrating Google Maps with private key

2.1 Getting the MD5 Fingerprint of Your Signing Certificate

For more information about using Keytool and Jarsigner to sign your application, see Signing Your Applications on the Android Developers site.
To register for a Maps API Key, you need to provide an MD5 fingerprint of the certificate that you will use to sign your application. Before you visit the registration page, use Keytool to generate the fingerprint of the appropriate certificate.
First, determine which key you will use to sign your application at release and make sure of the path to the keystore that contains it.
Next, run Keytool with the -list option, against the target keystore and key alias. The table below lists the options you should use.
Keytool Option
Description
-list
Print an MD5 fingerprint of a certificate.
-keystore <keystore-name>.keystore
The name of the keystore containing the target key.
-storepass <password>
A password for the keystore.
As a security precaution, do not include this option in your command line unless you are working at a secure computer. If not supplied, Keytool prompts you to enter the password. In this way, your password is not stored in your shell history.
-alias <alias_name>
The alias for the key for which to generate the MD5 certificate fingerprint.
-keypass <password>
The password for the key.
As a security precaution, do not include this option in your command line unless you are working at a secure computer. If not supplied, Keytool prompts you to enter the password. In this way, your password is not stored in your shell history.
Here's an example of a Keytool command that generates an MD5 certificate fingerprint for the key alias_name in the keystore my-release-key.keystore:
$ keytool -list -alias alias_name -keystore my-release-key.keystore
Keytool will prompt you to enter passwords for the keystore and key. As output of the command, Keytool prints the fingerprint to the shell. For example:
Certificate fingerprint (MD5): 94:1E:43:49:87:73:BB:E6:A6:88:D7:20:F1:8E:B5:98
Once you have the fingerprint, you can go to the Maps API registration site, described next.

2.2 Registering the Certificate Fingerprint with the Google Maps Service
When you are ready to register for a Maps API Key, load this page in a browser:
To register for a Maps API Key, follow these steps:
1.    If you don't have a Google account, use the link on the page to set one up.
2.    Read the Android Maps API Terms of Service carefully. If you agree to the terms, indicate so using the checkbox on the screen.
3.    Paste the MD5 certificate fingerprint of the certificate that you are registering into the appropriate form field.
4.    Click "Generate API Key"
The server will handle your request, associating the fingerprint with your developer identity and generating a unique Maps API Key, and then will return a results page that gives you your Key string.
To use the Maps API Key string, copy and paste it into your code as described in the next section.
Note: If you happen to forget your Maps API Key, you can generate a fingerprint for your certificate and register it again. The registration server will give you the same Maps API Key for the specified certificate fingerprint.

2.3            Integrating the Map key with application
In all map widgets residing in the application, open the “google map key” property in android section of properties and set the value obtained from the above step there.

3. Compile application

3.1 Compile the application in release mode
In order to release your application to users, you must compile it in release mode. In release mode, the compiled application is not signed by default and you will need to sign it with your private key.
3.2 Setting application permissions
By default Application will seek permissions for various phone features that the application uses.
These will be defined  in <workspacelocation>\temp\<appname>\build\luaandroid\dist\<appname>\AndroidManifest.xml
typical permissions will look like
            <uses-permission android:name="android.permission.CALL_PHONE"></uses-permission>
            <uses-permission android:name="android.permission.SEND_SMS"></uses-permission>
            <uses-permission android:name="android.permission.WRITE_SMS"></uses-permission>
            <uses-permission android:name="android.permission.ACCESS_FINE_LOCATION"></uses-permission>
            <uses-permission android:name="android.permission.ACCESS_COARSE_LOCATION"></uses-permission>
            <uses-permission android:name="android.permission.CAMERA"></uses-permission>
1.      Remove permissions that are not relevant to your application and save the file
2.      Download “ant” from the internet or from \\10.10.10.20\swdump\USERS\Suhas\apache-ant-1.8.1-bin.zip and extract it to local machine
3.      open command prompt and cd to below folder <workspacelocation>\temp\<appname>\build\luaandroid\dist\<appname>\
4.       run below command to generate unsigned binary
<ant-extracted-location>\bin\ant release

Note: Application permission setting need not be done, if default permission set is ok to be submitted to end user. While user downloads the application, the user will be notified that the app will use the above permissions. So its a good practice to ensure the permissions are obtained only for features that are used in app.
The location of the unsigned app binary when built from KonyIDE is <workspacelocation>\temp\<appname>\build\luaandroid\dist\<appname>\bin\<appname>-unsigned.apk
The above binary is what needs to be signed with the private key
Caution: You can not release your application unsigned, or signed with the debug key.


4. Sign your application with your private key

When you have an application package that is ready to be signed, you can do sign it using the Jarsigner tool. Make sure that you have Jarsigner available on your machine, as described in Basic Setup. Also, make sure that the keystore containing your private key is available.
To sign your application, you run Jarsigner, referencing both the application's .apk and the keystore containing the private key with which to sign the .apk. The table below shows the options you could use.
Jarsigner Option
Description
-keystore <keystore-name>.keystore
The name of the keystore containing your private key.
-verbose
Enable verbose output.
-storepass <password>
The password for the keystore.
As a security precaution, do not include this option in your command line unless you are working at a secure computer. If not supplied, Jarsigner prompts you to enter the password. In this way, your password is not stored in your shell history.
-keypass <password>
The password for the private key.
As a security precaution, do not include this option in your command line unless you are working at a secure computer. If not supplied, Jarsigner prompts you to enter the password. In this way, your password is not stored in your shell history.
Here's how you would use Jarsigner to sign an application package called my_application.apk, using the example keystore created above.
$ jarsigner -verbose -keystore my-release-key.keystore
my_application.apk alias_name
Running the example command above, Jarsigner prompts you to provide passwords for the keystore and key. It then modifies the .apk in-place, meaning the .apk is now signed. Note that you can sign an .apk multiple times with different keys.
To verify that your .apk is signed, you can use a command like this:
$ jarsigner -verify my_signed.apk
If the .apk is signed properly, Jarsigner prints "jar verified". If you want more details, you can try one of these commands:
$ jarsigner -verify -verbose my_application.apk
or
$ jarsigner -verify -verbose -certs my_application.apk
The command above, with the -certs option added, will show you the "CN=" line that describes who created the key.
Note: If you see "CN=Android Debug", this means the .apk was signed with the debug key generated by the Android SDK. If you intend to release your application, you must sign it with your private key instead of the debug key.
For more information about Jarsigner, see the documentation at http://java.sun.com/j2se/1.5.0/docs/tooldocs/#security

5. Align the final APK package

Once you have signed the .apk with your private key, run zipalign on the file. This tool ensures that all uncompressed data starts with a particular byte alignment, relative to the start of the file. Ensuring alignment at 4-byte boundaries provides a performance optimization when installed on a device. When aligned, the Android system is able to read files with mmap(), even if they contain binary data with alignment restrictions, rather than copying all of the data from the package. The benefit is a reduction in the amount of RAM consumed by the running application.
The zipalign tool is provided with the Android SDK, inside the tools/ directory. To align your signed .apk, execute:
zipalign -v 4 your_project_name-unaligned.apk your_project_name.apk
The -v flag turns on verbose output (optional). 4 is the byte-alignment (don't use anything other than 4). The first file argument is your signed .apk (the input) and the second file is the destination .apk file (the output). If you're overriding an existing .apk, add the -f flag.
Caution: Your input .apk must be signed with your private key before you optimize the package with zipalign. If you sign it after using zipalign, it will undo the alignment.
For more information, read about the zipalign tool.

Publishing application to Marketplace:

Other requirements for submission to Android Market place.
ñ   2 Screenshots of the Android app. (320w x 480h or 480w x 854h 24 bit PNG or JPEG (no alpha) Full bleed, no border in art Landscape thumbnails are cropped)
ñ  Promotional graphic (optional) (180w x 120h 24 bit PNG or JPEG (no alpha) Full bleed, no border in art)
ñ  Title (30 chars max)
ñ  Description (325 chars max)
ñ  Promo_Text (80 chars max) (has to be provided if promotional graphic is given)
ñ  Category of app - Category options(Comics, Communication, Demo, Entertainment, Finance, Health, Lifestyle, Multimedia, New & Weather,Productivity, Reference, Shopping, Social, Software libraries, Sports, Themes, Tools, Travel)
ñ  Contact info - website, email, phone
ñ  Marketing Opt-Out – if option is selected it means “Do not promote my application except in Android Market and in any Google-owned online or mobile properties. I understand that any changes to this preference may take sixty days to take effect. “
ñ  High Resolution Application Icon (optional) - 512w x 512h, 24 bit PNG or JPEG (no alpha)
ñ  Feature Graphic (optional) - 1024w x 500h ,24 bit PNG or JPEG (no alpha) ; Will be downsized to mini or micro
ñ  Promotional Video link (optional) -  Enter promotional videos YouTube URL


The screenshots and promotional graphic and video link and promo_text are optional and would be used only if the Geico android app is showcased in their android market. But its better to provide the same if its not considerable extra effort
For more reference please read the below links.
Signing Your applications:
http://developer.android.com/guide/publishing/app-signing.html

Versioning Your applications:
http://developer.android.com/guide/publishing/versioning.html
[NOTE: The version number that is entered in the IDE is automatically taken into the android application for versioning]

Preparing for Publishing:
(A Checklist)
http://developer.android.com/guide/publishing/preparing.html

Publishing your Application:
(Android market place)
http://developer.android.com/guide/publishing/publishing.html